At first glance a typical audio mixer can seem impossibly complex. All of the dials and sliders, lights and meters, input and output jacks can be quite intimidating, and you may not even know how or where to begin.
Despite their appearance, though, mixers are actually really simple to use, and once you learn the basics and gain just a little experience they can become quite natural and intuitive.
We have put together this short tutorial to help you understand what a mixer is, what the different controls, meters, and indicators, input and output jacks are used for and how to “master the mix,” using your audio mixer to get the very best sound.
What is a Mixer?

source: https://commons.wikimedia.org/wiki/File:Yamaha_mg102_side.jpg
An audio mixing console is a piece of equipment designed to let you bring together many different audio sources, such as musical instruments, microphones, stereo equipment and more, and mix the different sources into a single stereo audio signal.
You can control each one of the sources in many different ways. Whether it is a voice through a microphone, the sound of a guitar, music from a CD player or any other audio signal, it can be made louder or softer, can be equalized to increase or decrease the high frequencies, midrange or bass, and can be moved left or right in the stereo signal. Then all of these optimized “channels” are combined together into one (hopefully) well balanced and great sounding mix.
Connecting your mixing console to an amplifier and speakers, or using a pair of headphones plugged directly into the mixing board, you can easily monitor your work. Once you have the mix just right you can then output the final signal into an amplifier and speakers, for any sized audience or any sized room, or into an analog or digital recorder or other audio processing equipment.
Audio mixers are absolutely necessary when you are bringing together various sources. Whether you are doing sound for a band, giving a sales demonstration or putting together audio for a corporate presentation, making recordings or video soundtracks, or you are a DJ trying to get an entire room of people to get up and dance, basic knowledge of how a mixer works and how best to use it is absolutely essential.
The Layout

source: https://commons.wikimedia.org/wiki/File:Yamaha_mg102.jpg
Analog audio mixers come in many different sizes and levels of complexity, but they all work in basically the same way. We will use an excellent basic mixer, the Yamaha MG10/2, as our reference, but again all of these instructions can easily be applied to any other soundboard.
Again, just looking at the picture can be a little daunting – what are all of those dials and jacks used for, and how can you ever keep them all straight? But the layout and function of any mixer can be broken into three simple sections – Input and Output; Channel Control; Master Control Section. Once this is understood, the rest is easy.
Inputs and Outputs

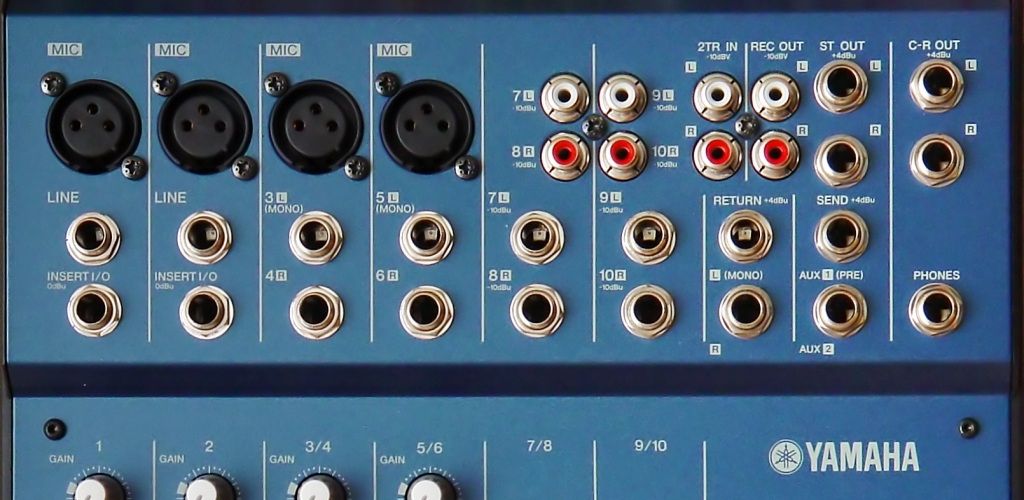
The top panel of the mixing board is where all the input cables are plugged in. There are three basic types of connectors used:
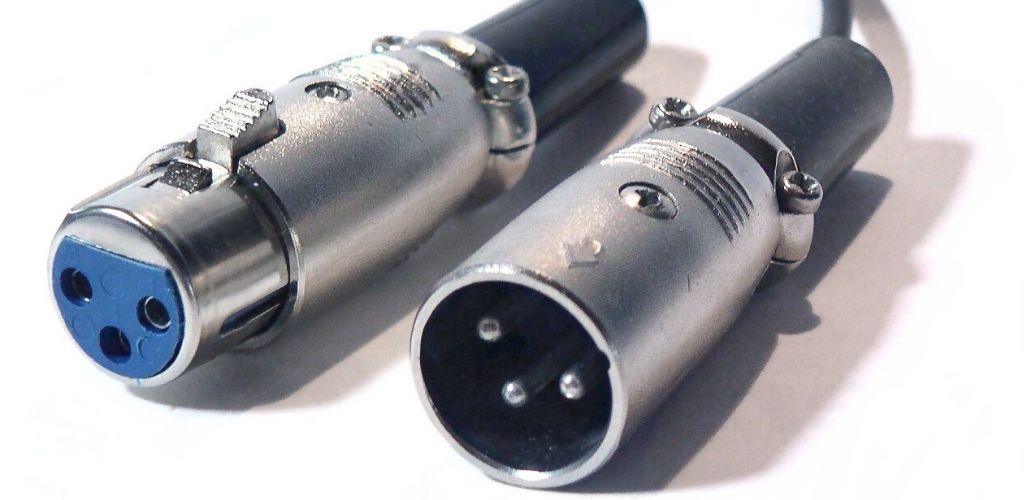
The XLR jack, which can be either balanced or unbalanced, is often used for microphones and various types of professional audio equipment. Microphones typically have a very low signal level, and so their cables almost always use balanced connectors to reduce noise.

source: https://en.wikipedia.org/wiki/XLR_connector
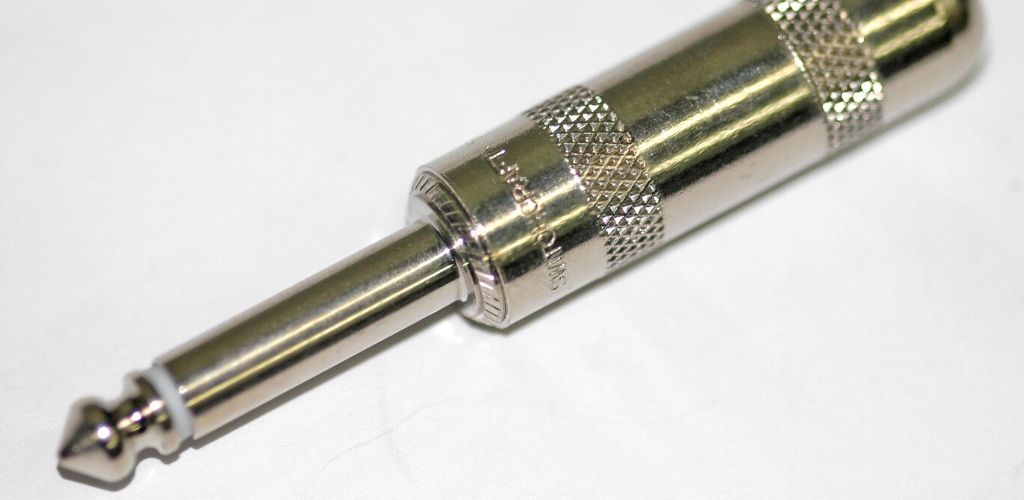
The phone plug is often used for guitars and other musical instruments. These connectors can be balanced (for lower noise) or, more commonly, unbalanced, but balanced connectors are always best for long cable lengths.

source: https://en.wikipedia.org/wiki/Phone_connector_(audio)
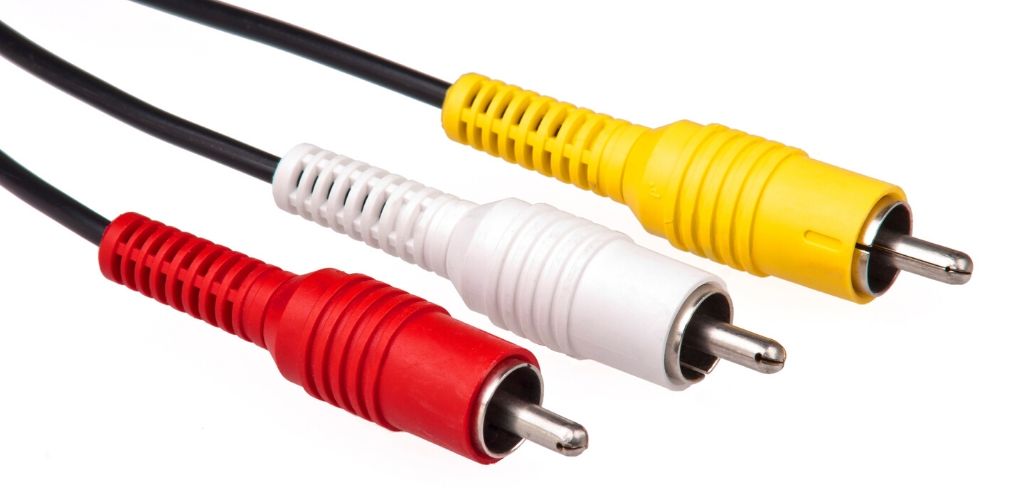
The RCA jack is often used in consumer electronics, and is what you would use to connect a CD player, cassette tape deck or other piece of home stereo equipment.

source: https://en.wikipedia.org/wiki/RCA_connector
Channels 1 and 2 are meant for mono signals, and are ideal for microphones (using the balanced XLR connector) or musical instruments with a monaural signal like an electric guitar (using either the balanced or unbalanced phone plug).
Channels 3-4 and 5-6 are stereo inputs, and can be used for stereo microphones, instruments with stereo output signals (like many synthesizers and keyboards) or any other stereo signals. These channels can also be used for mono signals.
Channels 7-8 and 9-10 are also stereo, and are meant more for consumer electronics equipment. This is where you would plug in a CD player, tape deck or other source with RCA type connectors. These input areas also offer phone plug inputs, usually unbalanced.
There are additional input and output jacks in this section, used for other sources, monitors and processing equipment.
The 2TR input offers unbalanced RCA plugs for an additional stereo source, which will go into the mix without any control other than signal level.
The REC OUT jacks can be used for an external recorder.
The ST OUT jacks are stereo outputs used to connect your Yamaha mixer to a stereo amplifier used for powering your main speakers.
It is important to carefully monitor the output level from the mixing board going into the amplifier. This is done using the ST Master Fader (see below). Too high of a signal will greatly distort the sound, and can even possibly damage the amp or speakers. You may not be able to hear the main speakers while you are at the mixing board, so practice and experience, as well as a close eye on the Level Meters, are crucial.
The C-R OUT jacks are used to connect the mixed signal to your monitoring system. This is another jack used to connect the mixer to an amplifier – not for the main speakers, but for monitor speakers used while you’re mixing.
The PHONES jack is used for headphones, and, like the C-R OUT jack above, allows you to monitor the sound.
Channel Controls

source: https://commons.wikimedia.org/wiki/File:Yamaha_mg102.jpg
The signal for each piece of connected equipment is controlled in this section. There is a separate row of controls for each set of input jacks, allowing you to control each channel’s input gain, output level, left-right channel balance, and output to auxiliary equipment.
The gain control sets the signal level of the input signal. Each source will feed a different level of audio signal into the mixer, and it is important to set the gain knob for each input individually so that the peak light does not come on, or comes on only occasionally, thus ensuring that the source does not overload the mixer’s circuitry and cause distortion. You should adjust this knob when the source (singer, guitar, prerecorded signal, etc) is at its loudest.
The equalizer controls allow you to increase or decrease the level of high, mid-range or low frequencies in the individual channel’s audio signal. You may find that a microphone sounds too bright, and want to decrease the high frequencies, or that a bass drum, in a given room, is too boomy, and sounds better with the low frequencies reduced.
The pan control moves the signal from left to right, allowing you to place individual voices and instruments, or any other audio source, in an effective stereo picture. For stereo signals, such as those you might have connected to channels 3-10 on the Yamaha, this knob will act instead as a left-right balance control.
The aux control allows that particular signal to also be send to another “auxiliary” audio output, letting you record or hear alternative mixes or send certain signals to various processing equipment.
Finally, the level control adjusts the signal level as the channel goes into the main mix. If a voice seems too loud compared to the accompanying instruments, you can use this knob to decrease that particular channel’s relative volume, and thus achieve a pleasing balance of all voices, instruments and other sounds in the mix.
Master Control Section
The Master Control Section is where the level of the final stereo signal, as mixed from the various inputs using the channel controls, is monitored and adjusted before being sent to its final destination. You can connect the mixer to an amplifier which in turn will amplify speakers, to a different external amplifier to power your own monitor speakers, or to an external audio recorder or other sound processing equipment.
The Phantom +48V switch supplies a 48 volt DC power supply to all channels with XLR jacks. Care should be used when employing this switch, as it can cause damage to unbalanced connections, as well as possible adding hum and noise to the audio signal.
The Return control adjusts the level of the signal feed from external processing equipment used in the send/return loop.
The 2TR control adjusts the gain of the input signal feed from the 2TR jacks.
The ST Master Fader controls the output level to the ST OUT jacks, which usually feed your main amplifier and speaker system.
The CR/PHONES control adjusts the level of both the headphone jack and the C-R output jacks, as used for monitoring.
The Power indicator simply indicates that the mixing board is powered on.
The Level Meters show the signal level of the left and right channels of the master mix. The 0 light indicates “normal” output levels, and while levels above 0 may not necessarily cause overload or clipping distortion, each piece of equipment will react differently to different signal levels, and you will learn from experience the best levels to use.
Mastering the Mix
Now that you know what a mixer actually does, and in addition what plugs go where, what the knobs control and what the indicators indicate, it is time to put together a mix. Some very basic hints and suggestions can really make a difference in how your final signal sounds.
Be sure the input gain is optimized
As discussed above, most channels have a clipping indicator and a gain control. If the signal coming in is too hot, the sound of that channel – and the whole mix – will really suffer. Remember to adjust the gain when the signal (the singer’s voice, for example) is at its highest expected level.
Give the stereo image room to bloom
Instruments, vocals and sound effects need the opportunity to find their own timbre and space. While sometimes two or more sources (a voice and a guitar, for example) may be put close together for effect, in general it is nice for each to have its own space, which will make it, and the final mix, sound better.
Use effects judiciously
The equalizer controls can greatly improve a sound, but it is important to remember that they can also hurt the sound. If a cymbal sounds too hot, and you cut the high frequency, you are also reducing the air and space around that cymbal. Pianos have an enormous amount of low energy, and can often benefit from some reduction of low frequencies, but too much can reduce the energy and excitement of the piano’s sound. And all effects, including EQ, will add at least a little noise and distortion.
Use good quality gear, including cables and connectors
While many, if not most, cables can use unbalanced connectors, in almost every case a balanced connector will also work, and will always provide lower noise. Remember that all amplification applied to a voice’s or instrument’s original input signal will also amplify the noise.
The sound through your headphones or monitor speakers may be different than what comes through the main amplifier and speakers – make sure to listen to your final mix through both. Similarly, don’t just assume that a mix that sounds good though your ‘phones will also sound good on tape. Do some trial runs, and ultimately adjust the mix to be best for the audience or the recording, not for yourself.
And, most importantly, have fun!

